How To Create Gun/Muzzle Flashes
This page describes the techniques we used for creating muzzle flashes.
This tutorial assumes the use of Adobe Premiere but the technique can be applied to other video editing packages as required. I am also assuming that the user is familiar with the basics of using Adobe Premiere.
This page describes the techniques we used for creating muzzle flashes.
This tutorial assumes the use of Adobe Premiere but the technique can be applied to other video editing packages as required. I am also assuming that the user is familiar with the basics of using Adobe Premiere.
There are four elements to a good gun shot effect. Source footage, muzzle flash, sound and of course shell casings for all you people out there with automatic weapons. Unfortunately we didn't have any real automatic weapons so we decided that for our future projects we had better work out how to fake them ...
Step 1: Film Footage Start with your actor firing the weapon. No amount of fx are going to make up for poor source material. There are a few suggestions I can make here.
a) make sure the weapon you are using looks realistic. Obviously a black handgun is going to look better than a lime green water pistol.
b) with a handgun don't try to film your actor firing multiple shots per second. It will be extremely hard to add flash and sound to shots if there is very little time between them. One shot every 2 seconds should be your maximum rate of fire.
c) Make sure your actor does a good job of representing the recoil of the gun. If the movement is too spongy it will be hard to workout exactly where to put the sound and gun flash later on. Gun shots should result in a short, sharp flick of the wrist. This makes it very clear where the gun shot actually happened. Editing will become much simpler if you can do this. And it will look better. I'm no expert in the true dynamics of gun fire but this is about what looks cool not what looks realistic.
Step 2: Capture Footage Ok so you've got some footage of your actor firing off a few rounds. Get this footage from your camera into your PC.
Step 3: Import Footage Into Premiere Fire up Adobe Premiere, create a new project and import your source files into the file 'bin'. Select and drag the video clip into one of the video tracks. In this example I have used Track 1A.


Step 4: Add Sound effect (reload.wav & big_gun.wav) Set the time line resolution so that you see the point at which the reload occurs. Position the timeline cursor at this point. Don't worry about the accuracy at the moment.
We need to position the sound effect in the correct place. There is no easy way of doing this so I suggest just dragging the effect into one of the audio tracks at the timeline cursor position. Expand the audio track so you can get a feel of the 'shape' of the sound profile.


Step 5: Adjust Sound Effect Preview the clip and listen. The chances are that the sound is not quite in the right place. It is either happening before or after your brain thinks the reload is happening. If it is very noticeable then drag the sound effect left or right as appropriate.
Repeat step 5 until the movement of the actor and the sound effect appear to match. You may have to zoom-in a bit by adjusting the timeline resolution so you can tweak the position of the sound effect in smaller steps. Once the shotgun reload sound is looking ok you can use a similar procedure to add a gun shot sound.
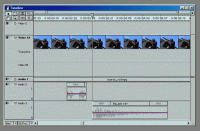
Step 6: Adding Gun Flashes So you've got a few gun shots with sound. The next step is adding the gun flashes. Now there is an easy way and a hard way of doing this. I have tried both ways and the easy way is better.
a) add a single muzzle flash
b) add an animated muzzle flash
I prefer the first option. It is easier and quicker and looks just as good in my opinion.
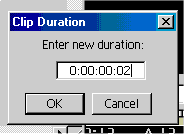
The Gun flash graphic should be a bmp image file with a distinct background colour (i.e. bright green) although my example has a plain black background. Drag the image into a spare video track (Track 2 or greater so that it allows you to add transparency). Right click on it and set the duration to 2 frames.
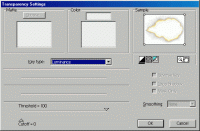
 We now need to do two things. Firstly we need to make the background of the flash image transparent so that the flash appears on top of the video clip. Secondly we need to position the flash so it appears at the correct position on the screen. i.e. at the end of the gun.
To set the transparency right click on the image and select 'video options' then 'transparency'. Select 'Luminance' from the drop down list (See picture to the right).
To position the image at the current location right click and select the 'Motion' menu item.
Using the eye dropper tool set the fill colour to black (See picture to the right) Drag the start frame to a position that corresponds to the end of the gun's barrel. Drag the finish frame to the same point. Use the numbers in the options section to ensure the start and finish points have matching coordinates.
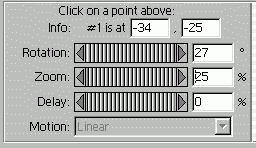 Add rotation to the start/finish points so that the muzzle flash is aligned to the gun's barrel. Adjust the amount of zoom so that the muzzle flash is the correct size. The preview window should show what the effect looks like. Click 'ok' to return to the main timeline. Preview the gunshot.

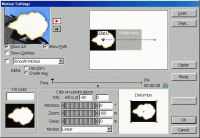
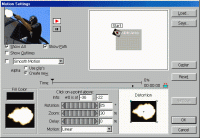
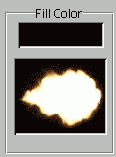

Step 7: Adjust Muzzle Flash Preview the clip and using the motion menu adjust the flash image position as required.

Step 8: Render Final Shot
Once your project is complete export the final shot. In Adobe Premiere we combined these three elements (footage, gun flash and sound) to produce the following test clips : Muzzle Flash Example 1, MPEG1 65kb
Muzzle Flash Example 2, MPEG1 65kb
Muzzle Flash Example 3, MPEG1 95kb
Here is an example of the source footage used in this tutorial, although it is a lower resolution than the original : Muzzle Flash Tutorial Source, MPEG1 250kb
Muzzle Flashes Here is a zip file of gun flash images for pasting onto your own gun related footage : Muzzle Flash Archive [280kb]
Sound
There are plenty of gun related sound effects in my Sound Effects Library. Single gun shots, machine guns, explosions, ricochets etc. Give 'em a try until you find one that matches your footage.
Shell Cases No self respecting cop/criminal/hero is going to be seen in a gun fight without serious numbers of shell casings flying out his trusty handgun and/or assault rifle. Once again not having any real firearms meant we had to cheat ... and so we have started to build a collection of computer generated shell casings to add to our gun fights. Here is a test clip we created in a 3D modelling package : Shell Case Clip [110kb].
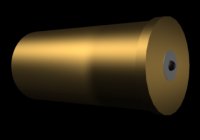 Adam C created a shell case animation in LightWave 7. This consisted of a shell case (cylinder with one end open) moving along an arc. We gave it a grey background so that it could be made transparent later on. It was positioned in exactly the same way as the gun flash image using the 'Motion' menu item. Obviously it is important to get the shell case starting from the gun and flying off in the right direction.
The 'Zoom' option can be used to adjust the size of the shell case. This allows you to use the same shell case for both hand guns and shotguns.
Obviously in real life the difference between a shotgun cartridge and a 9mm casing is noticeable. When they are flying through the air in your film they won't be so don't worry too much about it!!
Repeat the above for all gunshots. You will get quicker at getting the sound right the more you do. Don't worry about getting the sound exactly right. As long as it looks good it doesn't really matter whether it actually right!


