Cinematography and Lighting Guide! *READ*

Tutorials and guides or links covering software discussed in these forums.

Moderators: Admin, Moderator Team

Post Reply
ALove
Forum Addict
Forum Addict
Posts: 539
Joined: Thu Aug 14, 2003 3:27 pm
Location: Durango Colorodo

Cinematography and Lighting Guide! *READ*

Post by ALove »

Cinematography and Lighting Guide
___________________________________________________________________________________________________

I was browsing the Video Capture & Cameras thread and I noticed how most of the topics are "I'm buying a camera, which one is best," or something like that. In order to use these great cameras, it is helpful to know some cinematography and lighting techniques. With a good cam someone can still shoot c.r.a.p., and with a c.r.a.p. cam, someone can still make beautiful films. With both, imagine what you could achieve! So, I decided to post some Cinematography and Lighting tips. These are only basic rules.

Cinematography
_____________________________________________

Composition Techniques
__________________________________

Rule of Thirds - The Rule of thirds basically states "place the subject of interest in the outside third of your frame" You could also place the interest at the vertexs circled below.

Image
This is your compositon!

Put your subject at each of the crossing points, or in the outside part of the frame. This makes your shot much more interesting to look at.

Leading Lines - Use a strong directonal element in your composition to draw attention to what you want your viewers to focus on.

Image

Notice how the lines on the bridge draw attention to the city.

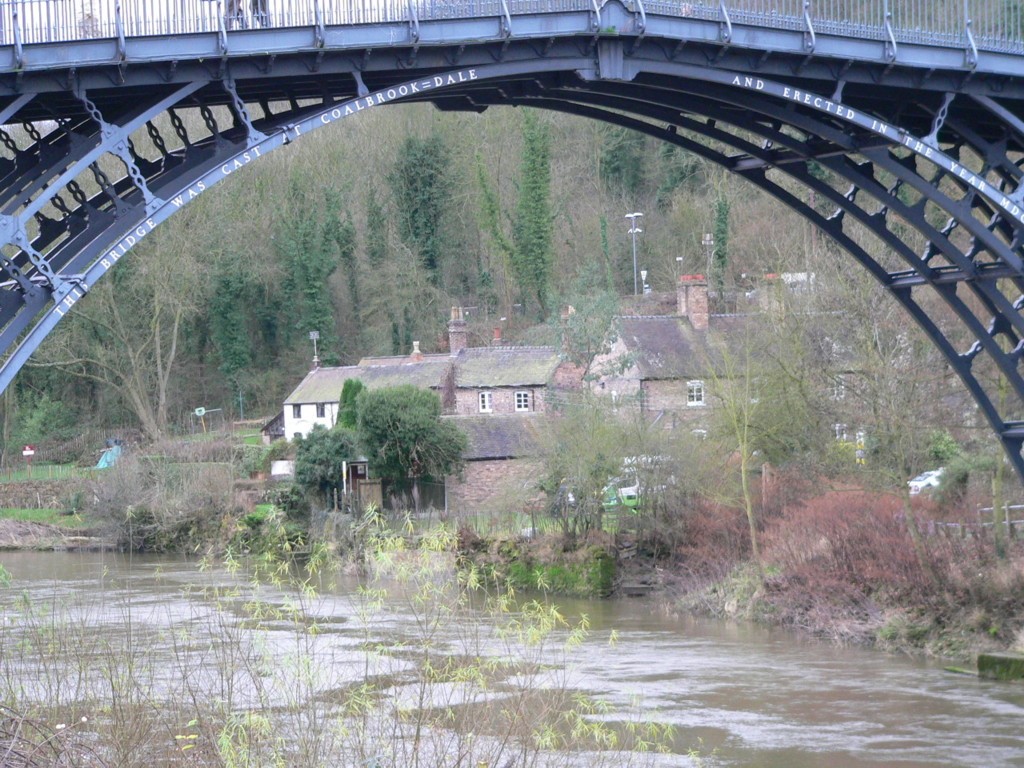
Framing - Use a positional element to hold the viewers attention at a particular spot in the composition

http://sucs.swan.ac.uk/~cmckenna/ttff/i ... ldings.jpg
Big picture so im not going to post it in the fourm.

Notice how the bridge frames up the house.

Close Ups - Pretty self explanitory, but you'd be surprised how neglected it is. Close ups are not necissicarly super intense (though they can be) and are usually used to show a character reaction.

Techniques to Avoid
__________________________________

These are some techniques that can degrade your composition strength if you are unexperienced.

Tonal Merger - When two alike colors are next to each other and seem to merge.

Edge Merger - when you cut off part of your subject with an edge or the frame.

Just remember to try to keep the whole subject horizontally in the frame. It also applies to Vertical, like cutting off your subjects head.

Dimensional Merger - A camera has no sense of depth. Your eyes do, having two lenses. When one lens merges the foreground and background, you get a demensional merger. This is especially common in Digital Video Camera, having a deep depth of field.


Balance
__________________________________

Symetrical Balance - Both sides of the composition carry the same weight. For example: two people are holding hands, one is on one side of the composition, the other is on the other.

Asymetrical Balance - One Side carrys more weight than the other. For Example: using Rule of thirds, the speaker is on one side of the composition.


Camera Movements Stationary
__________________________________

Zoom - Inside the lens. The camera basically enlarges the picture, with no perspective change. Note: Avoid using this technique!!! It can make your film look very amature like. If you must have your camera seem to get closer, use a dolly and have it actually get closer.

Pan - Keep the camera stationary. Move the direction the camera is pointing horizontally.

Tilt - Keep the camera stationary. Move the direction the camera is pointing vertically.


Camera Movements Moving
__________________________________

Dolly - Physically move the camera closer to where your subject. This results in a perspective change. Equivilant of a zoom. Note: Though this looks better than a zoom, try to avoid using it.

Truck - Physically move the camera sideways, walking past or walking beside your subject. Equivilant of a pan.

Pedestal - Physically move the camera in an upwards motion, rising or lowering the POV. Equivelent of a tilt.


Angles of View
__________________________________

High Angle of View - Place your camera above your subject.

Low Angle of View - Place your camera below your subject.

Subjective POV - View of the world through the subject's eyes.

Objective POV - View of the world and the subject through the camera's eye.

Shallow DOF - Less of your composition is in focus. This is a very popular look as it is like 35mm film. To achieve this, you can back up and zoom in. This however distorts perspective. You could also open your aperature to its widest setting and light accordingly, or use a Neutral Density filter. The reason 35mm film has a shallow DOF is because of the pick up elements size. (35mm is a lot bigger than 1/3"!!!) Note: There are specific devices to mimic 35mm film and allow 35mm lenses to be attached, but they cost a butt load of money. (7K without the lens!)

Deep DOF - More of your composition is in focus. This is not a very popular look as it is easily video. To achieve this, zoom out and walk up as close as you want. You could also close your aperature to its smallest setting, and light accordingly. Note: NOT recommended, as the light would wash out your whites.

Lighting
_____________________________________________

Now the fun part! (Not really, but it can make your video look much better, even though it can be fun for some people)

First and foremost though, make sure you have enough light!!! I cannot stress this enough.

Moving on...

Terms
__________________________________

Brightness - This is overall how bright your composition is. Usually you want your set to be bright, then darken in post if necissicary, as cameras tend to perform poorly in low light.

Contrast - How Black the Blacks are and how White your whites are. A high contrast can be good when used slightly, but when you go too far, it looks more like too harsh of light.

Incident Light - Light seen from a direct light source.

Reflected Light - Light bounced off something.

Color Temperature - Measured in Kelvins, white light is not always white, it can vary in color. This can be manipulated for special effects, but most always the tinting is done in post.

Image

Sunlight is Blue, Artificial Light (Tungsten or Incandescent) Light is Orange, Flourescent Light is Green (dont use flourescent!!! It can make your shot look very ugly!!!)

Thats why you white balance, to define to your camera what color you actually want white to be.

Hard Light - A very direct light, usually providing harsh shadows and high contrast.

Soft Light - A softer light that seems to wrap around the subject.

Spotlight - A narrowly focused, controlled, Hard light.

Floodlight - Less focused and not as Hard as a spotlight.


Three Point Lighting
__________________________________

Image
A basic setup. If you find the lighting too harsh, try bouncing it off the walls or reflectors.

The Key Light is the light that provides the most of your light and contrast.

The Fill Light is to fill the shadows created by the Key Light. This is usually softer and not as bright as the Key Light.

The Back Light is to provide highlights on the subject. This is usually not a direct or bright light. A Back Light helps seperate your subject from the background, giving more depth to your composition.

There it is! My guide to Cinematography and Lighting!!!

Anything you think is wrong, or if you want to add something, let me know!

:D Remember! Rules are meant to be broken! However, it is helpful to learn the rules before breaking them! :wink:
Last edited by ALove on Fri Mar 10, 2006 10:02 pm, edited 19 times in total.
[img]http://acemedia.sandfalls.com/banner.jpg[/img]
I3lade203
Forum Veteran
Forum Veteran
Posts: 2345
Joined: Sat Oct 25, 2003 11:39 pm
Location: NY
Contact:

Post by I3lade203 »

Dosn't this belong in tutorials? :roll:
Sigs suck a**.
ALove
Forum Addict
Forum Addict
Posts: 539
Joined: Thu Aug 14, 2003 3:27 pm
Location: Durango Colorodo

Post by ALove »

Its not telling you how to do something, its just explaining the techniques.
[img]http://acemedia.sandfalls.com/banner.jpg[/img]
I3lade203
Forum Veteran
Forum Veteran
Posts: 2345
Joined: Sat Oct 25, 2003 11:39 pm
Location: NY
Contact:

Post by I3lade203 »

Well , it still would get more notice in tutorials, techincaly it's telling you how to do movements and such which is a tutorial more or less. Looks good though, people should read it but probably won't. It would help basiclly everyone but a few whom actaully know the basics on this site.
Sigs suck a**.
ALove
Forum Addict
Forum Addict
Posts: 539
Joined: Thu Aug 14, 2003 3:27 pm
Location: Durango Colorodo

Post by ALove »

Basically, its a set of rules. So it could go here too. Anyways though, i think people need to read this. It would help with the impact of their films immensly.
[img]http://acemedia.sandfalls.com/banner.jpg[/img]
I3lade203
Forum Veteran
Forum Veteran
Posts: 2345
Joined: Sat Oct 25, 2003 11:39 pm
Location: NY
Contact:

Post by I3lade203 »

Yes alove it would. But whenever I get a message from anyone on this site, I always try to help them with this type of thing outside on aim or msn, but nobody cares. Just shows how ignorent people on this site can be.
Sigs suck a**.
ALove
Forum Addict
Forum Addict
Posts: 539
Joined: Thu Aug 14, 2003 3:27 pm
Location: Durango Colorodo

Post by ALove »

In order to make your video look like film, just follow these rules!!! (of course, magic bullet also helps :wink:)

but seriously, these can make the difference between "what an amature" and "HOLY s***!!!! WHERE THE f*** DID YOU GET A PRO TO HELP YOU???"
[img]http://acemedia.sandfalls.com/banner.jpg[/img]
UFProductions
Forum Veteran
Forum Veteran
Posts: 1479
Joined: Sun Apr 18, 2004 5:12 am
Location: Calgary, Alberta, Canada

Post by UFProductions »

Nicely put together little guide there ALove.
Losing consciousness,
in the arms of an angel,
I find only peace.
ALove
Forum Addict
Forum Addict
Posts: 539
Joined: Thu Aug 14, 2003 3:27 pm
Location: Durango Colorodo

Post by ALove »

that actually took me the better part of the day today. :D
[img]http://acemedia.sandfalls.com/banner.jpg[/img]
UFProductions
Forum Veteran
Forum Veteran
Posts: 1479
Joined: Sun Apr 18, 2004 5:12 am
Location: Calgary, Alberta, Canada

Post by UFProductions »

It should be moved to the Tutorials section then, where it will live a long and fruitful life in the low turnover environment of such a quiet section.
Losing consciousness,
in the arms of an angel,
I find only peace.
ALove
Forum Addict
Forum Addict
Posts: 539
Joined: Thu Aug 14, 2003 3:27 pm
Location: Durango Colorodo

Post by ALove »

or it could become a sticky!
[img]http://acemedia.sandfalls.com/banner.jpg[/img]
NaziSentry

Post by NaziSentry »

It should! That was a helpful guide! seeing as my mum owns a production company and tells me this all the time.. it wasnt that helpful to me! :D
I3lade203
Forum Veteran
Forum Veteran
Posts: 2345
Joined: Sat Oct 25, 2003 11:39 pm
Location: NY
Contact:

Post by I3lade203 »

UFProductions wrote:It should be moved to the Tutorials section then, where it will live a long and fruitful life in the low turnover environment of such a quiet section.
Exactly what I said..
Sigs suck a**.
NaziSentry

Post by NaziSentry »

Bloody hell more spam!
ALove
Forum Addict
Forum Addict
Posts: 539
Joined: Thu Aug 14, 2003 3:27 pm
Location: Durango Colorodo

Post by ALove »

Lighting is easily one of the most important aspects of filmmaking!!!! :D It is important to learn to use it. Even outside using the sun as your key light and reflectors (tinfoil on cardboard anyone?) as your backlight and fill light, just practice. Trust me, your films would be 10 x better. :twisted: Since most of my upcoming shoot is outside, I plan on using reflectors and cloth, (to diffuse the light) :wink:
[img]http://acemedia.sandfalls.com/banner.jpg[/img]
UFProductions
Forum Veteran
Forum Veteran
Posts: 1479
Joined: Sun Apr 18, 2004 5:12 am
Location: Calgary, Alberta, Canada

Post by UFProductions »

The best type of reflector (cheap ones that is) are silver backed poster board. They are shiney and reflective, but have a matte finish, so you don't need to diffuse. and the the other side is white, which works better under some conditions. A two in one reflector for less than a dollar!
Losing consciousness,
in the arms of an angel,
I find only peace.
I3lade203
Forum Veteran
Forum Veteran
Posts: 2345
Joined: Sat Oct 25, 2003 11:39 pm
Location: NY
Contact:

Post by I3lade203 »

NaziSentry wrote:Bloody hell more spam!
You mean like your doing right now?

Lighting IS Debatably nearly the most important. Theres other things like actors, yes, BUT without lighting, it can be brilliant actors in some poorly lighted scene. Example, you can be trying to pull off some suspensfull horror type film, and if not set the mood it's your actors in a hallway. [/b]
Sigs suck a**.
mercenary123
Posting Freak
Posting Freak
Posts: 497
Joined: Sat Jul 17, 2004 4:42 am
Location: nowhere special
Contact:

Post by mercenary123 »

Really cool guide, I will diffenitly use it, especially the cinemotography part, that'll add a certain feel to my moves. But I will also use the lighting.

I though about this, get 3 of some kinda lamp thing, attach to PVC pipe stands, three lights, one with a 150w bulb, one with 100w, and the last one with 50w. That seems like it would work. What do yall think, cause since someone said something, all i see when i watch my movies is NOISE NOISE NOISE. I really want my movies to look more professional.

Please give comments.
[img]http://f5.putfile.com/6/16618192897.jpg[/img]
got lazy on the siggy...
User avatar
BrownCowStudios
Forum Addict
Forum Addict
Posts: 917
Joined: Tue Dec 03, 2002 4:06 am
Location: Columbus, Ohio

Post by BrownCowStudios »

I would recommend much higher wattage than what you're referencing. 250 watts at least, 500 watts would be more ideal for this kind of work. I have heard of others using much lower wattage bulbs in hardware clamp lamps, using bulbs that burn hot enough to register as white on video. Perhaps that may be a route you can take. One of the downfalls of this is the fact that the lights will need to be much closer to your subject, which will limit you creatively. For the time being though, some lighting is better than no lighting.
Erm... yeah...
Grant
Moderator
Moderator
Posts: 2982
Joined: Tue Dec 03, 2002 3:24 am
Location: Ballarat, Victoria, Australia
Contact:

Post by Grant »

a nice little guide so I popped it here
Post Reply